
Many of the APIs today are Web API’s designed to access web services like Facebook ,Twitter etc. Because of their widespread use most IOT services (AZURE,AWS,Bluemix) also support http based APIs.
To understand and use an http API you will need a reasonable understanding of the following:
- URLs and URIs – See HTTP Basics
- The HTTP protocol- See HTTP Basics
- JSON (JavaScript Object Notation) -See JSON for beginners
HTTP API Basics
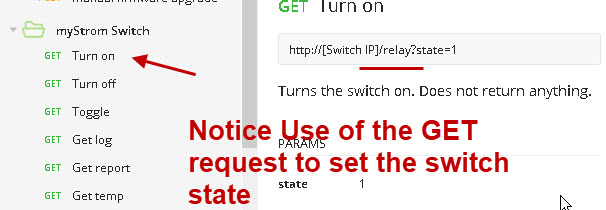
When using http based APIs the GET request is generally used for reading information and the POST request is used for writing information.
So if we take a switch as an example we would normally read the switch state using a GET request and set the state using a POST request.
Below is a screen shot taken from the mystrom web page showing the use of the GET request to set the switch state using url parameters.
IOT API Test Site and API
To learn to use IOT http APIs we also need a suitable simple IOT API to test against, and unfortunately there currently don’t appear to be any available on line.
Therefore I’ve created a basic API using node-red which is available as a flow.
If there is enough interest I will also make it available online.
Before we proceed I just would like to show you a typical IOT API provided by Amazon as an example:
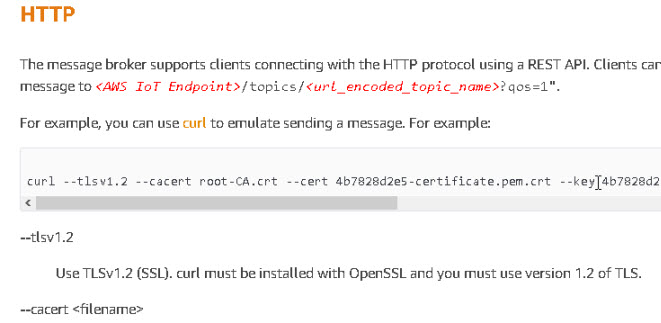
You can see straight away that it using security certificates which makes it very difficult to use for simple demonstrations and learning.
Testing Tools
To use and test IOT applications that use http based APIs you will require suitable testing tools.
Because http based APIs are common on the web these tools are well developed, and you can even use a web browser for simple GET requests.
For all other requests (POST,PUT,DELETE etc ) you need a tool that lets you make these request types, and also gives you the ability to change http request headers.
The ones you might want to consider are:
- curl– command line utility
- Postman– Most popular GUI tool for web developers but no longer available as a chrome extension.
- RESTClient – Add-on for Firefox
- Advanced rest client-Chrome extension
In this tutorial I will be using the advanced rest client and curl.
Introducing Our Home Made API
Our API will be used for controlling three simulated IOT devices.
- A switch
- A light Bulb
- A temperature and humidity sensor.
The Switch
It is possible to change the state of the switch using the GET request or POST request.
The partial url for the switch is myapi/switch1
The complete url is
http://localhost:1880/myapi/switch1
however the complete url will depend on your installation.
Note: You need port 1880 as we are using node-red.
To view the state of the switch use the get request to the url.
To change the state of the switch use:
myapi/switch1?state=off or myapi/switch1?state=on
The following table shows the API commands supported for the switch:
| Action | Request Type | url | parameters | Request Data |
| Get switch status | GET | myapi/switch1 | None | None |
| Set switch state on | GET | myapi/switch1 | state=on | None |
| Set switch state off | GET | myapi/switch1 | state=off | None |
| Set switch timer on | GET | myapi/switch1 | timer =on | None |
| Set switch timer off | GET | myapi/switch1 | timer =off | None |
| Set switch state on | POST | myapi/switch1 | None | “{“state”:”on”}” |
| Set switch state off | POST | myapi/switch1 | None | “{“state”:”off”}” |
| Set switch timer on | POST | myapi/switch1 | None | “{“timer”:”on”}” |
| Set switch timer off | POST | myapi/switch1 | None | “{“timer”:”off”}” |
Note: Currently error and sanity checking is limited on the API.
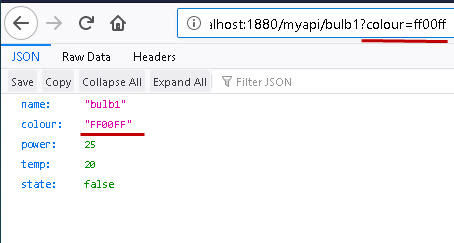
For the bulb the url is:
myapi/bulb1
and you can set the state to off and also the colour values to 000000-FFFFFF
Examples:
http://myapi/bulb1?state=on
http://myapi/bulb1?colour=ff00ff
Command Table
| Action | Request Type | url | parameters | Request Data |
| Get bulb status | GET | myapi/bulb1 | None | None |
| Set bulb state on | GET | myapi/bulb1 | state=on | None |
| Set bulb state off | GET | myapi/bulb1 | state=off | None |
| Set bulb colour | GET | myapi/bulb1 | colour =xxxxxx | None |
| Set bulb state on | POST | myapi/bulb1 | None | “{“state”:”on”}” |
| Set bulb state off | POST | myapi/bulb1 | None | “{“state”:”off”}” |
| Set bulb colour | POST | myapi/bulb1 | None | “{“colour”:x\”xxxxx\”}” |
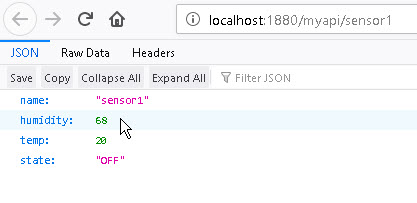
The temperature sensor is mainly read, but you can turn it on and off using both post and get requests.
Example usage:
http://localhost:1880/myapi/sensor1
Using the POST Request
You will need a suitable tool as discussed above. I will demonstrate using the Advanced Rest client on Google chrome.
The first thing is to select the method (POST) and then enter the url.
Then set the header to JSON, other headers can be left as default.

Now click on the body and enter the JSON command as shown below:
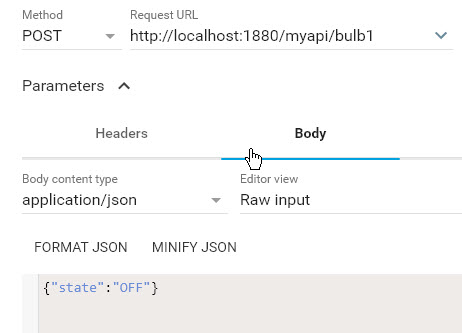
Once done click send and you should see the response:

Using Curl
Curl is a command line tool and is often the tool used to demo APIs. The command is:
curl -X POST "content-type:application/JSON" "http://localhost:1880/myapi/switch1" -d '{\"state\":\"ON\"}'
The result is shown below:
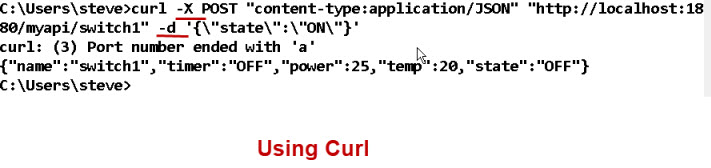
Note: not sure of the error but the command works
Resources

Related Tutorials
Hi , i want to thank you for your rich content it was very helpful . i was working on a IOT project i used simple get/post requests but i didnt understand the differences between API and this method ??
here is the Node -Red code . in which i am sending JSON objects back and forth (Get/Post) between server and ESP32 ..so what are the disadvantages of this method ???
[{“id”:”b56688c5.132d68″,”type”:”ui_button”,”z”:”c043cf8e.9fbab”,”name”:”button”,”group”:”4abde384.aad474″,”order”:2,”width”:0,”height”:0,”passthru”:false,”label”:”button”,”tooltip”:””,”color”:””,”bgcolor”:””,”icon”:””,”payload”:”true”,”payloadType”:”bool”,”topic”:””,”x”:570,”y”:280,”wires”:[[“3d76078b.d12b9”]]},{“id”:”4abde384.aad474″,”type”:”ui_group”,”z”:””,”name”:”SENSORS”,”tab”:”2b8559ab.f8b276″,”order”:1,”disp”:true,”width”:”6″,”collapse”:false},{“id”:”2b8559ab.f8b276″,”type”:”ui_tab”,”z”:””,”name”:”HTTP”,”icon”:”dashboard”,”order”:1,”disabled”:false,”hidden”:false}]
Hi
There is an error in the flow and I can’t import it.Can you use the ask steve page to send it to me. Also check that it is complete flow as it looks a bit short
Rgds
Steve